Posts Tagged ‘CMS’
Sitecore MVC walk-through of refactoring a static website
About
I will give an example of refactoring a static responsive website into an existing web management system (WMS) or a content management system (CMS).
More specifically this is an example of how a static webpage can be extracted into a Sitecore MVC system.
- I will use Sitecore 8 with MVC as the WMS.
- I will use Creative Bootstrap theme for the static responsive website.
Summary
The static website is a one-page website where content and presentation are hard-coded into one big html file.
The page is refactored to different sections of views and the content is extracted into the WMS as data sources for the corresponding views.
The result is a one Layout, which has sections of views with their data sources.
Examples of static and dynamic view binding has been provided, examples of how to use shared data sources and how to code for unknown N items to be rendered.
Disclaimer
To understand this post you properly have to know some level of Sitecore.
There are many ways to structure and place the templates and data. This example is just one approach of many possibilities.
Some might argue that a better best practice is to use custom view-models, mapper tool/approach like Glass mapper, alternatives to used navigation data source setup.
In a real bigger project that might be the case, but for this task I chose the simple and faster approach.
Visual studio files and Sitecore package
All the created items and files for this refactoring task are available at.
https://github.com/kunukn/Sitecore/tree/master/startbootstrap-creative-example/Sitecore8
If you want to play with the result:
- Install the Sitecore package
- Add the VS files to your Sitecore project and deploy
Sitecore
This is a commercial WMS based on the .Net stack. Sitecore MVC is based on Asp.net MVC.
Sitecore is considered as one of the leading WMS according Gartner and Forrester Research.
Creative Bootstrap theme
License & Author Details:
Apache 2.0 by Start Bootstrap
http://startbootstrap.com/template-overviews/creative/
https://github.com/IronSummitMedia/startbootstrap-creative
Live preview of the static markup can be seen here
http://ironsummitmedia.github.io/startbootstrap-creative/
The webpage is responsive and the layouts adapts to different screen sizes.
The page has a navigation on the top with the following navigation items:
about, services, portfolio, contact.
When you click on the navigation item, it scrolls to the section of the page.
Here is the bird’s eye layout structure of the webpage.
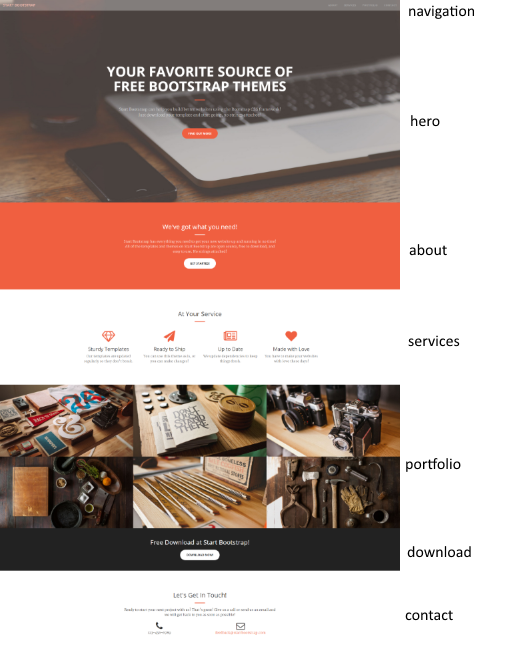
We have a hero and a download section that is not part of the navigation.
Analysis and strategy
As it is a one-page website, we will only use one Layout. The different sections of the page will be extracted to separate views.
There are no business logic in this example.
That makes the re-factoring all about moving content inside the Sitecore WMS.
I will only use View Renderings to keep things simple. Controller Renderings are not needed for this re-factoring task. I will only use the model RenderingModel. That means no custom view-models. Sometimes the code will be cleaner when using custom view-models, but I want to keep things as simple as possible for this example. I will instead create a helper method to make the code in the view more DRY.
The location of the files will be centralized as much as possible to make it easier to maintain and to isolate it from other Sitecore stuff.
For the Visual studio (VS) project.
All the assets files will be moved to the folder /assets/start-bootstrap
All the layout and views will be created in the folder /Views/start-bootstrap
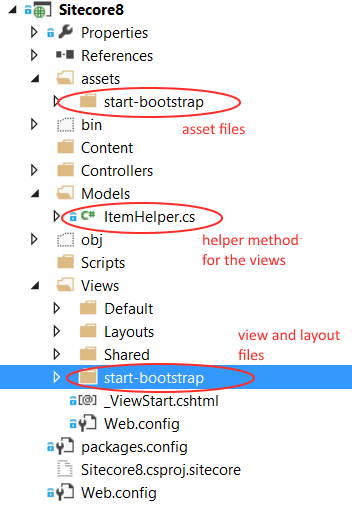
My Sitecore installation runs at http://sitecore8.local
The url of the page will be at http://sitecore8.local/start-bootstrap
The naming strategy is to use meaningful names and to align the names in the VS project with the Sitecore items.
For the Sitecore content setup.
All the content will be at sitecore/Content/Home/start-bootstrap
The layout file will be at sitecore/Layout/Layouts/start-bootstrap
The renderings files will be inside sitecore/Layout/Renderings/start-bootstrap
All the templates will be inside the folder sitecore/Templates/start-bootrap

The approach
The approach is relatively trivial.
- The first step is to get the static website to work in Sitecore.
- The following steps is to gradually re-factor the code until the content and presentation are separated into to logically allocated views and where the fields are editable in edit mode.
This is the steps I am going to follow.
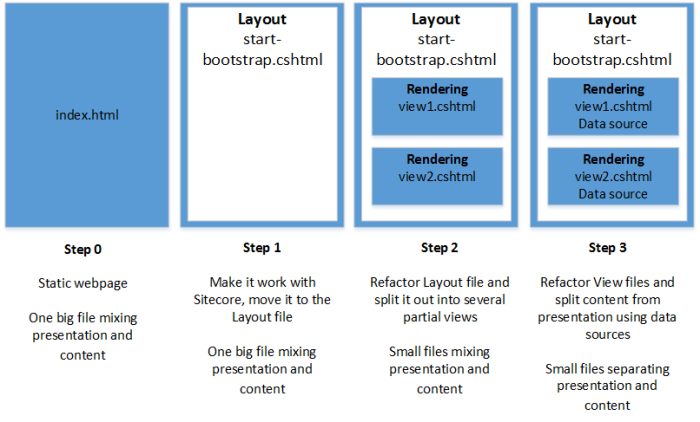
Step 1.
Get it to work with Sitecore.
Create the layout file start-bootstrap.cshtml in Visual studio and copy the content from index.html into the cshtml file.
Update the resource path to start from ~/assets/start-bootstrap
index.html
<!DOCTYPE html>
<html lang="en">
<head>
    <meta charset="utf-8">
    <meta http-equiv="X-UA-Compatible" content="IE=edge">
    <meta name="viewport" content="width=device-width, initial-scale=1">
    <meta name="description" content="">
    <meta name="author" content="">

    <title>Creative - Start Bootstrap Theme</title>

    <!-- Bootstrap Core CSS -->
    <link rel="stylesheet" href="~/assets/css/bootstrap.min.css">
...
start-bootstrap.cshtml
<!DOCTYPE html>
<html lang="en">
<head>
	<meta charset="utf-8">
	<meta http-equiv="X-UA-Compatible" content="IE=edge">
	<meta name="viewport" content="width=device-width, initial-scale=1">
	<meta name="description" content="">
	<meta name="author" content="">

	<title>Creative - Start Bootstrap Theme</title>

	<!-- Bootstrap Core CSS -->
	<link rel="stylesheet" href="~/assets/start-bootstrap/css/bootstrap.min.css">
...
In Sitecore I create a start-bootstrap item below the Home item with a basic template (no fields for now).
I create a Layout item called start-bootstrap with path to /Views/start-bootstrap/start-bootstrap.cshtml.
The start-bootstrap item is set to have the created layout.
Now I am ready to test that it works in Sitecore.
I start my browser at http://sitecore8.local/start-bootstrap?sc_mode=normal and check the console for errors.
It complained about woff2 extension types so I added this in the web.config and re-published the website and the errors went away.
This is because my IIS has to know it is allowed to run those file extension types.
  <system.webServer>
    <staticContent>
      <mimeMap fileExtension="woff" mimeType="application/font-woff"/>
      <mimeMap fileExtension=".woff2" mimeType="application/font-woff2"/>
    </staticContent>
  </system.webServer>
I tested re-sizing the screen and navigating around. Seems to work. So far so good.
What I have a static website inside Sitecore that works.
Step 2
The next step is to re-factor the start-bootstrap.cshtml file in to multiple views.
What I would like to have is partial views for each section in the webpage and separate the content into data sources. I will wait with the data sources until step 3.
The following views are created.
navigation, hero, about, services, portfolio, download, contact.
The navigation and hero will be statically bound because those sections have fixed positions for the webpage. Navigation is always at the top and the hero section is the landing page.
The remaining sections will be dynamically bound which means the section order can be changed.
A static binding with a data source looks like this.
@Html.Sitecore().ViewRendering("path-to-view-file.cshtml",
		new { DataSource = "path-to-sitecore-data-source-item" })
A dynamic binding looks like this
@Html.Sitecore().Placeholder("placeholder-name")
index.html
...
<body id="page-top">

<!-- navigation -->
<nav id="mainNav" class="navbar navbar-default navbar-fixed-top">...</nav>

<!-- hero section -->
<header>...</header>

<!-- about section -->
<section class="bg-primary" id="about">...</section>

<!-- services section -->
<section id="services">...</section>

<!-- portfolio section -->
<section class="no-padding" id="portfolio">...</section>

<!-- download section -->
<aside class="bg-dark">...</aside>

<!-- contact section -->
<section id="contact">...</section>

...
start-bootstrap.cshtml
...
<body id="page-top">

<!-- navigation -->
@Html.Sitecore().ViewRendering("/Views/start-bootstrap/navigation.cshtml",
new { DataSource = "/sitecore/content/Home/start-bootstrap/data sources/navigation" })

<!-- hero section -->
@Html.Sitecore().ViewRendering("/Views/start-bootstrap/hero-section.cshtml",
new { DataSource = "/sitecore/content/Home/start-bootstrap/data sources/hero section" })

<!-- The remaining sections -->
@Html.Sitecore().Placeholder("section")

...
The content from the index.html are split out into the following views.
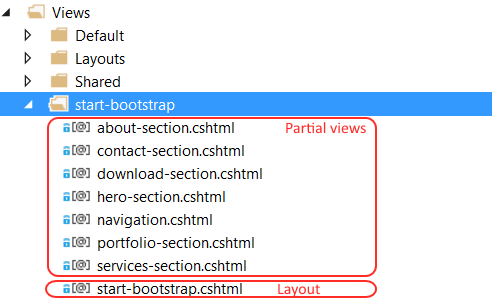
The layout files include all the partial views through static and dynamic binding. The layout file is decided to be in the start-bootstrap folder to keep the files centralized as much as possible.
In Sitecore the sitecore/Content/Home/start-boostrap item has the following presentation details setup.
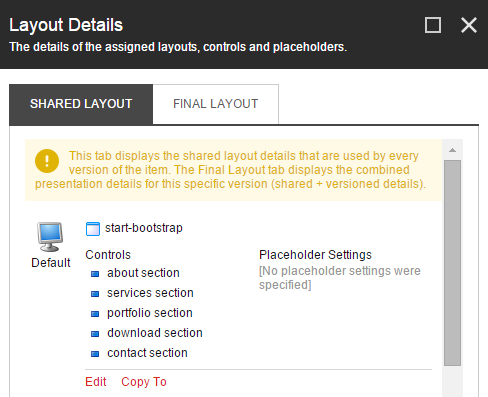
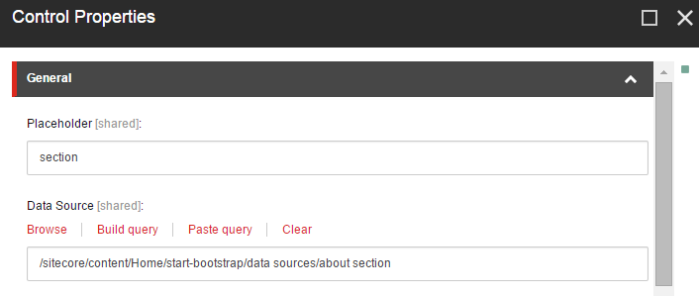
The dynamic binding of the about section Rendering is as follows.
All the other dynamic views also has the section value for the placeholder key.
The content of the navigation.cshtml is simply the the navigation part refactored to that view.
<nav id="mainNav" class="navbar navbar-default navbar-fixed-top">
    <div class="container-fluid">
        <!-- Brand and toggle get grouped for better mobile display -->
        <div class="navbar-header">
            <button type="button" class="navbar-toggle collapsed"
              data-toggle="collapse" data-target="#bs-example-navbar-collapse-1">
                <span class="sr-only">Toggle navigation</span>
                <span class="icon-bar"></span>
                <span class="icon-bar"></span>
                <span class="icon-bar"></span>
     <       </button>
            <a class="navbar-brand page-scroll" href="#page-top">Start Bootstrap</a>
        </div>

        <!-- Collect the nav links, forms, and other content for toggling -->
        <div class="collapse navbar-collapse" id="bs-example-navbar-collapse-1">
            <ul class="nav navbar-nav navbar-right">
                <li>
                    <a class="page-scroll" href="#about">About</a>
                </li>
                <li>
                    <a class="page-scroll" href="#services">Services</a>
                </li>
                <li>
                    <a class="page-scroll" href="#portfolio">Portfolio</a>
                </li>
                <li>
                    <a class="page-scroll" href="#contact">Contact</a>
                </li>
            </ul>
        </div>
        <!-- /.navbar-collapse -->
    </div>
    <!-- /.container-fluid -->
</nav>
Step 3
Now this is the most fun part. We separate the content into data sources.
This is all my created data sources for the views.
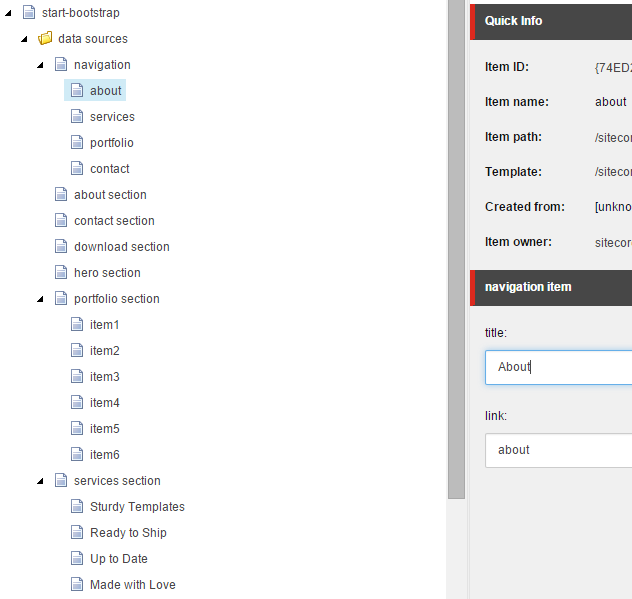
The navigation items are created as children items of the navigation data source.
With this approach we can have N navigation items and avoid hard-coding the number of items in advance.
There is a navigation item that links to the about section.
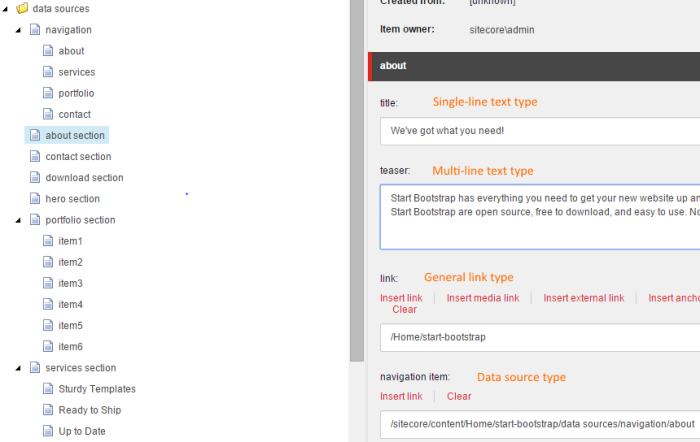
I add a data source type in my about section data source which points to the about navigation item.
A data source type is a reference type.
Now the about navigation item is shared by the navigation view and by the about section view
If I need to update the navigation link I will only do it once.
This ensures a DRY-way and is less error prone for content management where I don’t have to remember to update data multiple places.
A dynamic field binding which is editable in edit mode looks like this.
The Model.Item will be used when a Sitecore item is not provided in the html helper method.
@Html.Sitecore().Field("field-name")
A specific Sitecore item can also be applied for the field.
@Html.Sitecore().Field("field-name", item)
navigation.cshtml is updated to use a data source.
To render the N navigation items a foreach loop is used.
@using Sitecore.Mvc
@using Sitecore.Mvc.Presentation
@using Sitecore.Data.Items
@model RenderingModel

<nav id="mainNav" class="navbar navbar-default navbar-fixed-top">
	<div class="container-fluid">
		<!-- Brand and toggle get grouped for better mobile display -->
		<div class="navbar-header">
			<button type="button" class="navbar-toggle collapsed"
			  data-toggle="collapse" data-target="#bs-example-navbar-collapse-1">
				<span class="sr-only">Toggle navigation</span>
				<span class="icon-bar"></span>
				<span class="icon-bar"></span>
				<span class="icon-bar"></span>
			</button>
			<a class="navbar-brand page-scroll" href="#page-top">
				@Html.Sitecore().Field("title")
			</a>
		</div>

		<!-- Collect the nav links, forms, and other content for toggling -->
		<div class="collapse navbar-collapse" id="bs-example-navbar-collapse-1">
			<ul class="nav navbar-nav navbar-right">
			@foreach (Item navigationItem in Model.Rendering.Item.Children)
			{
				<li>
					<a class="page-scroll"
						href="#@Html.Sitecore().Field("link", navigationItem)">
						@Html.Sitecore().Field("title", navigationItem)
					</a>
				</li>
			}
			</ul>
		</div>
		<!-- /.navbar-collapse -->
	</div>
	<!-- /.container-fluid -->
</nav>
I use the following extension helper method for the views to get to the data source referenced item.
ItemHelper.cs
using Sitecore.Data.Fields;
using Sitecore.Data.Items;

namespace Sitecore8.Models
{
    public static class ItemHelper
    {
        public static Item
        GetDataSourceTargetItemByFieldName(this Item item, string fieldName)
        {
            DatasourceField datasourceField = item.Fields[fieldName];
            return datasourceField.TargetItem;
        }
    }
}
about.cshtml is updated to use a data source.
@using Sitecore.Data.Items
@using Sitecore.Mvc
@using Sitecore.Mvc.Presentation
@using Sitecore8.Models
@model RenderingModel

@{
	Item linkItem = Model.Rendering.Item
		.GetDataSourceTargetItemByFieldName("navigation item");
	var link = linkItem["link"];
}

<section class="bg-primary" id="@link">
	<div class="container">
		<div class="row">
			<div class="col-lg-8 col-lg-offset-2 text-center">
				<h2 class="section-heading">
					@Html.Sitecore().Field("title")
				</h2>
				<hr class="light">
				<p class="text-faded">
					@Html.Sitecore().Field("teaser")
				</p>
				@Html.Sitecore().Field("link")
			</div>
		</div>
	</div>
</section>
Now the about section is editable.
I type this in my browser and navigate to the about section.
http://sitecore8.local/start-bootstrap?sc_mode=edit
I can edit the fields, great.
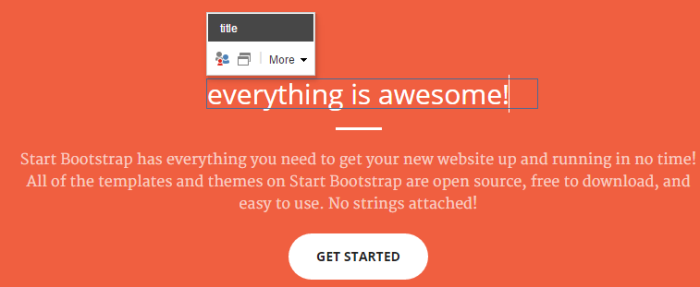
But I cannot save!?
My browser console log shows
Uncaught TypeError: saveButtonState.onchange is not a function
It seems the JavaScript used by Sitecore in edit mode and the JavaScript files in the webpage are colliding somehow.
I postpone the deeper investigation and as a quick fix for now, I ensure the webpage JavaScript are not running in edit mode.
I update my Layout view file.
start-bootstrap.cshtml
...
@if (Sitecore.Context.PageMode.IsNormal)
{
	<!-- jQuery -->
	<script src="~/assets/start-bootstrap/js/jquery.js"></script>

	<!-- Bootstrap Core JavaScript -->
	<script src="~/assets/start-bootstrap/js/bootstrap.min.js"></script>

	<!-- Plugin JavaScript -->
	<script src="~/assets/start-bootstrap/js/jquery.easing.min.js"></script>
	<script src="~/assets/start-bootstrap/js/jquery.fittext.js"></script>
	<script src="~/assets/start-bootstrap/js/wow.min.js"></script>

	<!-- Custom Theme JavaScript -->
	<script src="~/assets/start-bootstrap/js/creative.js"></script>
}
...
And now I can click save and update the fields in edit mode.
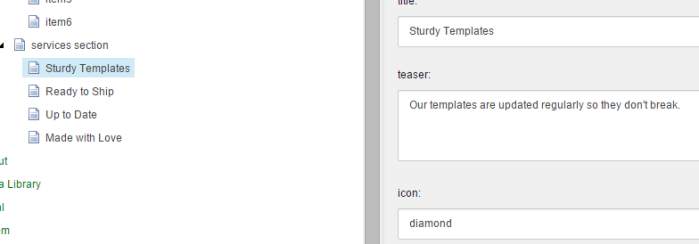
services-section.cshtml is updated to use a data source.
The icon can be updated by a text-field in edit mode.
Depending on the page mode the content can be adjusted by checking the PageMode.
E.g. this snippet only runs in edit mode.
@if (@Sitecore.Context.PageMode.IsPageEditorEditing)

{

...

}
@using Sitecore.Mvc
@using Sitecore.Mvc.Presentation
@using Sitecore.Data.Items
@using Sitecore8.Models
@model RenderingModel

@{
	Item linkItem = Model.Rendering.Item
		.GetDataSourceTargetItemByFieldName("navigation item");
	var link = linkItem["link"];
}

<section id="@link">

	<div class="container">
		<div class="row">
			<div class="col-lg-12 text-center">
				<h2 class="section-heading">
					@Html.Sitecore().Field("title")
				</h2>
				<hr class="primary">
			</div>
		</div>
	</div>

	<div class="container">
		<div class="row">

		@foreach (Item serviceItem in Model.Rendering.Item.Children)
		{
		<div class="col-lg-3 col-md-6 text-center">
			<div class="service-box">
				<i class="fa fa-4x fa-@serviceItem["icon"] wow bounceIn text-primary">
				</i>

				@if (@Sitecore.Context.PageMode.IsPageEditorEditing)
				{
					<div>
						@Html.Sitecore().Field("icon", serviceItem)
					</div>
				}

				<h3>
					@Html.Sitecore().Field("title", serviceItem)
				</h3>
				<p class="text-muted">
					@Html.Sitecore().Field("teaser", serviceItem)
				</p>
			</div>
		</div>
		}

		</div>
	</div>
</section>
Services section data source
The icon is simply a text-field type.
The icons used are from Font Awesome web-fonts and they use css classes with fa- prefix.
Services section in edit mode
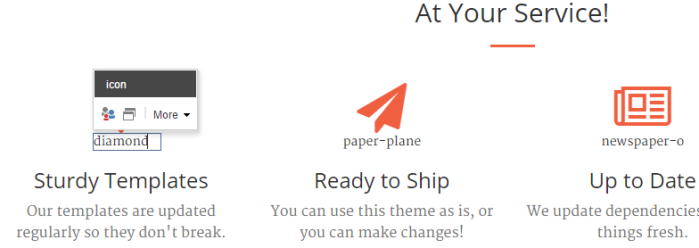
The icon text-field is only displayed in edit mode.
Here I can for example type car and click save to update to a new icon
Font Awesome car – http://fortawesome.github.io/Font-Awesome/icon/car/
I will stop the walk-through now as the rest of the refactoring is similar in method to what has been presented.
The rest of the refactored views are available to see at my GitHub repository:
https://github.com/kunukn/Sitecore/tree/master/startbootstrap-creative-example/Sitecore8
Dynamic binding of the views.
Because the last 5 sections were dynamically bound I can easily re-order them in the layout.
In Sitecore I go to presentation details and re-order so the download section is at the top.
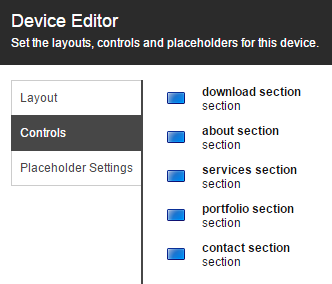
Then when I re-load the webpage I can see the download section is now at the top just below the hero section.

Prerequisites
You will need to have Sitecore 8 installed and running, xDB is not needed for this example.
Installation guide
I have used these steps to setup my Sitecore installation
https://github.com/kunukn/Sitecore/blob/master/Installation/Sitecore8/README.md
Reference learning materials
http://jockstothecore.com/sitecore-mvc-item-maze/
https://www.youtube.com/user/SitecorePM
Browser only CMS
This is an idea for a very minimalistic CMS solution.
You only need a browser to run the CMS solution. No web-server or DB are needed to host your CMS solution.
The content is separated to a resource folder (the content folder).
Text resources are stored inside a JavaScript file and not on a markup (html) page.
Here’s a snippet example of multiline text in markdown format stored in the resource file.
app-data.js
 Site.data = {
        multiline: function() {
            /*!
# browser only cms

**Dependencies:**
any modern browser and your favorite text editor.

Open the index.html with your browser.

  * Your browser is the server
  * Your CMS is the content folder
  * Your CMS editor is your favorite text-editor.

To edit the content open the
`content/text/app-data.js` file
and refresh your browser to see the update.
            !*/
        }.parseMarkdown()
}
Browser only CMS is available at https://github.com/kunukn/browser-only-cms
